Teardown and fasteners
How to organize fasteners when disassembling a car
A simple system of containers, labels and technical photos keeps teardown context usable months or years later.
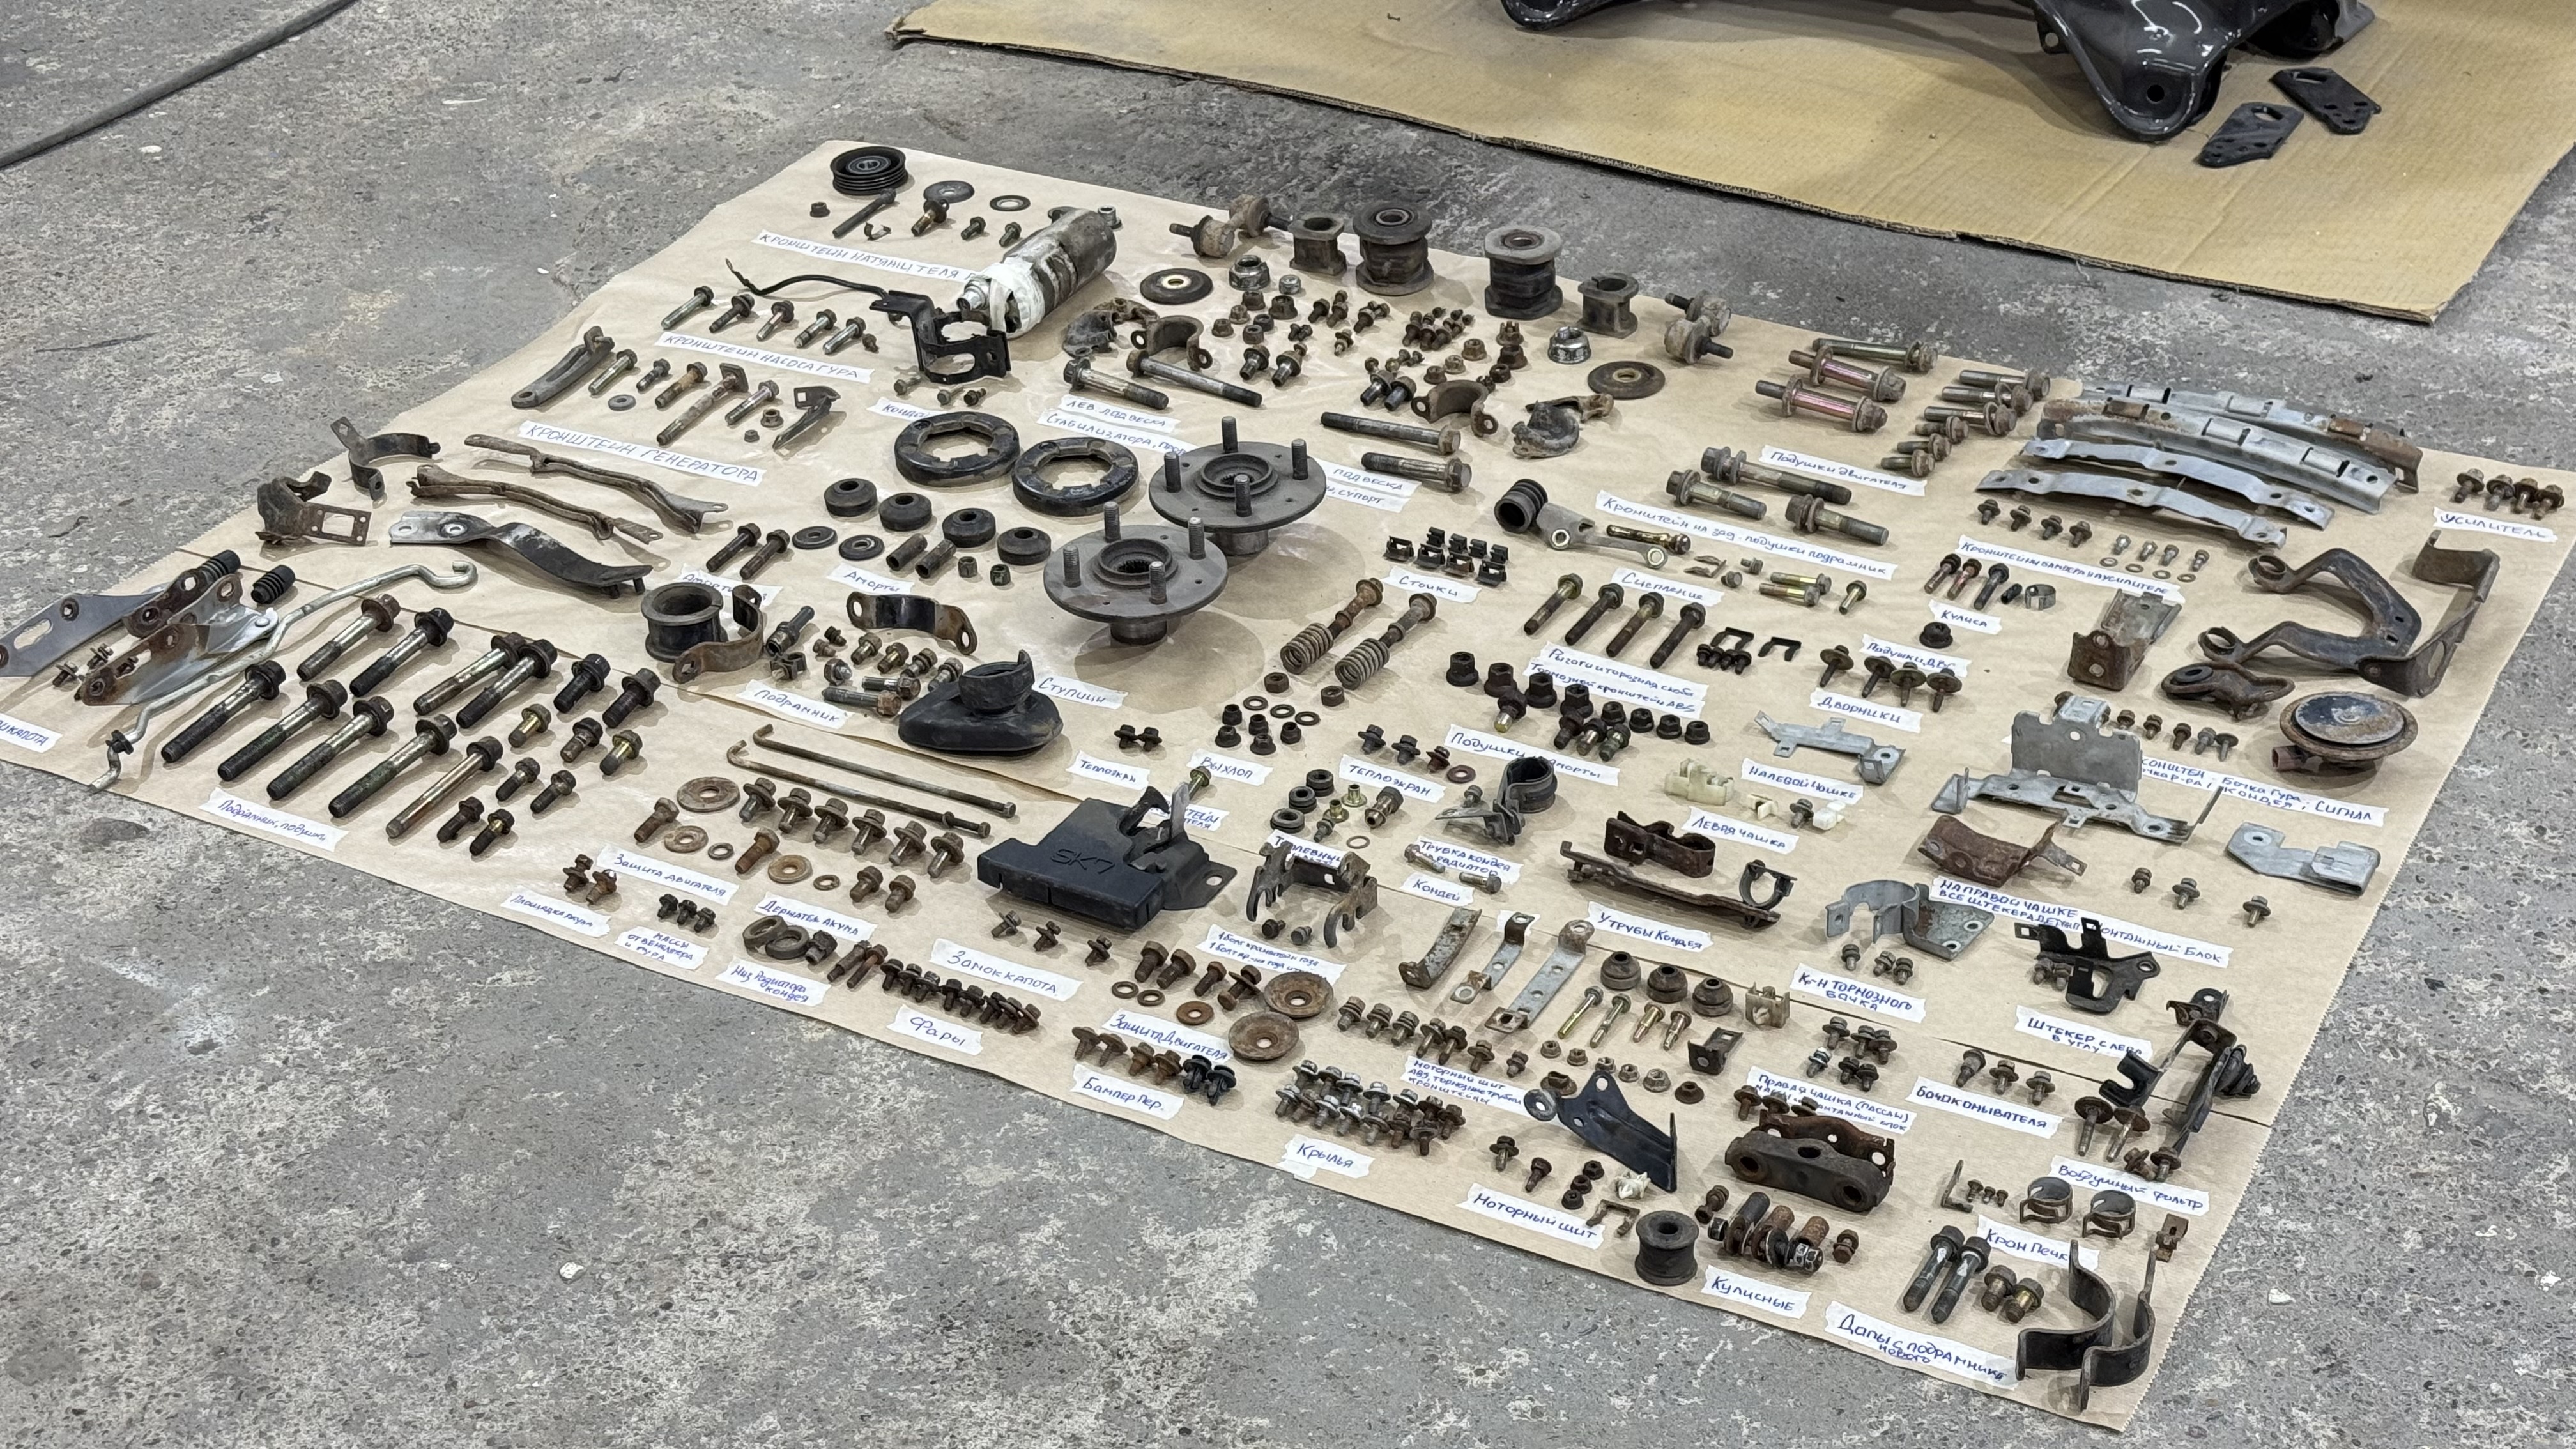
How to label, photograph and store fasteners during teardown, send them for treatment and avoid mixing parts during assembly.
When the first assembly comes off, a few bolts feel easy to remember. A few weeks later the garage contains similar bolts, nuts, washers, sleeves and brackets. Some stay near the car, some go out for treatment, and some assemblies wait for months.
A few months later, it is hard to remember where a specific bolt went, which side a washer was on or whether a spacer belonged to that mounting point.
First, look at how fasteners can be organized in an ideal setup. You do not have to copy every detail: the rest of the article covers simple rules that also work in an ordinary garage.
What the ideal can look like
In an ideal setup, removed parts and fasteners are laid out by assembly, with a label beside every group. Even months later, you can see what has been treated, what is missing and where each part will go during assembly.
A layout like this takes space and time, but it lets you check a large batch at a glance. It also makes the amount of finished work visible, which genuinely helps with motivation during a long restoration.
You decide how far to take it. Sometimes a labelled bag and a couple of photos are enough; sometimes laying out the entire assembly is useful. The rules below can be combined into a system that suits your garage and project.
Prepare containers before teardown
Small boxes, containers or thick bags should be ready before you start removing the next assembly. Then fasteners go straight to their place instead of waiting on a shelf.
A label should name not only the car system, but the exact location. 'Suspension bolts' leaves too many options. 'Front left suspension - control arm mounting' is much more useful during assembly.
Useful label examples
- front left suspension - control arm mounting
- gearbox - rear mount
- starter - mounting and spacers
- radiator - upper brackets
Keep together what was installed together
If a bolt was installed with specific washers, a sleeve or a nut, keep the set together when possible. Leave washers on the bolt and thread the nut back on loosely.
If a removed fastener does not block the work and does not need cleaning, it can sometimes be returned by hand to its original hole. Months later you will not be choosing from several nearly identical bolts.
This is not always suitable. Do not leave bolts in the body before welding, painting or blasting, and do not mistake a hand-installed bolt for a tightened one.
If similar bolts of different lengths sit next to each other, photograph their position before removing them.
Take photos for future assembly
A technical photo does not have to be beautiful. Its job is to save positions that are hard to describe in words.
After removal, lay the fasteners from one assembly on a surface and photograph them from above. The photo helps check quantity and groups.
Do not delete a bad-looking photo too quickly. Months later the needed washer or bracket may be visible at the edge of the frame.
What should be in the frame
- bolt position and direction
- order of washers, sleeves and spacers
- length differences between nearby bolts
- bracket orientation before removal
- the full fastener set after teardown
Make an inventory before sending fasteners out
Fasteners that leave the garage need separate recording. Before plating or other treatment, group parts by assembly, add labels and photograph each group from above.
The goal is not to create a catalog entry for every washer. You need enough information to understand what came back and where it belongs.
Before handing parts to a shop
- separate fasteners by assembly
- label each group
- take an overall photo and close-ups
- record the count of rare or important parts
- save the handover date and shop name
Check completeness as soon as parts return
Lay the returned parts out in roughly the same groups and compare them with the before photos. Missing parts are easier to resolve immediately.
After fresh plating, similar fasteners become harder to tell apart because rust marks and color differences disappear. Put them back into labeled groups right away.
This short check prevents the search for one missing bolt when the assembly is already ready to install.
A simple system is enough for a garage project
If the ideal layout is not possible, the system is still useful. A garage restoration benefits from a few habits repeated every time an assembly comes apart.
The longer the project lasts, the more valuable those habits become. A year later you return to a group with a name, photos and a short history of what happened to it.
Short checklist
- prepare a container before teardown
- label fasteners immediately and by exact location
- keep bolts, washers, sleeves and nuts together when possible
- photograph the assembly before teardown
- photograph removed fasteners as one group
- record the batch before sending it out
- check completeness as soon as it returns
Organize teardown as if someone else will assemble the car. In a year, that person may be you.
Real Stepwise examples
Public pages with real project photos, stages, tasks and related work for the same vehicle.
-
Volkswagen Golf Mk1 gearbox maintenance project
A complete public project with phases, tasks, photos and parts.
-
Volkswagen Golf Mk1 public restoration projects
A public subject page grouping several projects for the same car.